Miniature Café Dollhouse Kit: Tips for a Cozy Build
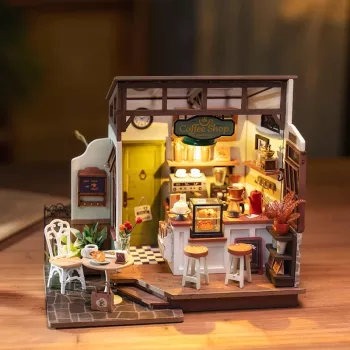
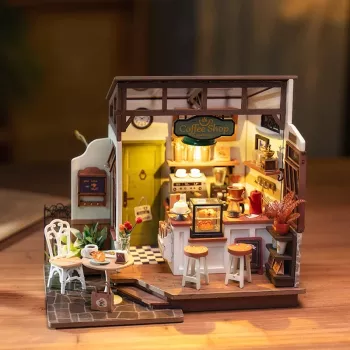
Miniature Café Dollhouse Kit: Build a Cozy Coffee-Shop Scene at Home
Create a charming café vignette with a hands-on miniature kit designed for careful assembly, detailed decorating, and a satisfying final display. Whether you’re building for a calm weekend project or a gift-worthy keepsake, a café scene brings recognizable “real life” moments into a compact display. Below is what to expect, how to prep your workspace, and practical tips for cleaner glue lines, straighter walls, and a sturdier finished shop.
What Makes a Miniature Café Scene So Satisfying
A café theme is packed with tiny, familiar objects—menus, cups, pastries, shelves, and signage—so the finished build feels lively rather than purely decorative. Many steps are short and repeatable (fold, glue, place, let dry), which makes it easy to work in small sessions without losing momentum.
Unlike a full dollhouse, a café vignette fits neatly on a desk, bookshelf, or craft display and still looks “complete.” Along the way, you’ll practice fine-motor control and visual planning—especially when lining up straight edges, keeping counters level, and placing miniature items so they look naturally used instead of randomly scattered.
What’s Typically Included in a Miniature Café Dollhouse Kit
Most miniature café kits include a pre-cut “shell” plus the furnishings and décor that create the shop atmosphere. Exact materials vary by design, so it helps to review the listing photos closely before ordering.
- Pre-cut structural pieces for walls, floor, and façade elements that form the café shell.
- Mini furniture and fixtures such as counters, shelves, tables, stools, or display cases (varies by kit design).
- Decor components like printed signs, food/drink miniatures, plants, and small accessories to complete the café atmosphere.
- LED lighting elements in many kits, adding warm “shop window” realism (check the listing for what’s included).
- Instruction booklet or step cards that show assembly order, part placement, and wiring notes if lighting is included.
Before You Start: Workspace, Tools, and Setup
Set yourself up for fewer lost pieces and fewer do-overs. A bright, uncluttered surface is a big advantage, and a light-colored mat makes tiny parts easier to spot. Sort components into small trays or cups by type (paper, wood/plastic pieces, décor items) so you’re not hunting mid-step.
Plan around drying time: many stages come out cleaner when you let glue set fully before moving on. Keep cotton swabs or a lint-free cloth nearby to wipe away squeeze-out before it cures and becomes glossy.
Helpful Tools for a Cleaner Build
| Tool | Why it helps | Tip |
|---|---|---|
| Precision tweezers | Positions small parts accurately | Use angled tips for tight corners |
| Craft knife + spare blades | Clean cuts and trimming tabs/edges | Cut on a self-healing mat for safer control |
| Small scissors | Quick trimming of paper pieces | Reserve a sharp pair for paper only |
| Ruler or small square | Keeps walls and counters aligned | Check 90° corners while glue sets |
| Clips or rubber bands | Holds pieces together during drying | Pad contact points to avoid dents |
| Glue applicator (fine tip) | Prevents glue blobs on visible surfaces | Apply in tiny dots, then spread thinly |
Assembly Approach That Prevents Crooked Walls and Loose Furniture
The difference between a “handmade” look and a polished look is usually alignment and glue control. Start by dry-fitting: place parts without adhesive to confirm orientation and see which edges will remain visible. If something is slightly off, it’s far easier to trim or flip a piece before glue is involved.
Lighting and Finishing Touches for a Café Glow
Display, Care, and Keeping Tiny Details Looking New
If kids will be around the finished piece, remember it’s still a display model with small components. For safety guidance on small items, review the U.S. Consumer Product Safety Commission’s information on choking hazards, and for broader toy safety context see ASTM F963.
Who It’s Great For (and When to Gift It)
Miniature Café Dollhouse Kit: Quick Product Snapshot
At-a-Glance
| Item | Detail |
|---|---|
| Product | Miniature Café Dollhouse Kit |
| Price | 33.97 USD |
| Availability | In stock |
| Product page | https://unmatchedgoodsmart.shop/miniature-cafe-dollhouse-kit/ |
Other in-stock picks to round out your craft-and-home setup
- Compact 400W Mini Juicer with 16oz Cup – Easy & Efficient Fruit Juice Extractor (a fun add-on for a kitchen-themed gift bundle).
- 5-Level Cat Tree with Large Hammock, Scratching Posts, and Cozy Condo for Indoor Cats (helpful if you want your curious “helpers” occupied while you craft).
FAQ
How long does it take to complete a miniature café kit?
Most builds take several hours to a couple of days depending on pace, drying time, and how detailed the decorating is. Beginners often split it into multiple sessions, and placing the tiniest accessories can take longer than assembling the main structure.
Do these kits include glue and tools?
Inclusions vary by kit, so the safest approach is to confirm what’s listed on the product page before ordering. Even when basics are included, having tweezers, a craft knife, small scissors, and a fine-tip glue applicator ready can make the process cleaner.
Is it suitable for kids?
Many kits contain small parts, sharp-edged components, and may require blades or adhesives, so they can be a choking or cut hazard. With adult supervision, it may suit older kids with strong fine-motor skills, but it’s generally best treated as a guided craft rather than a free-play toy.








Leave a comment