Build a Mini Garage Workshop Kit with Cozy LED Glow
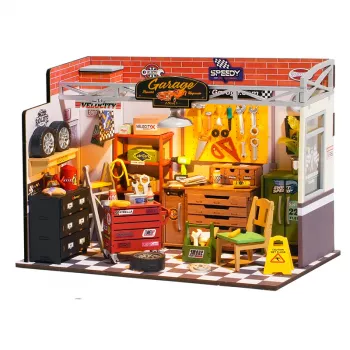
DIY Miniature Garage Workshop Craft Kit with LED Lights
A miniature garage workshop scene brings together careful handcrafting, tiny details, and a finished display that looks great on a shelf or desk. This kit focuses on a classic workshop vibe—tools, benches, storage, and warm LED lighting—making it a satisfying build for crafters who enjoy hands-on projects and a realistic final result. If you’re ready to build a compact diorama with a cozy “late-night in the garage” glow, the DIY Miniature Garage Workshop Craft Kit with LED Lights is a fun way to turn a few evenings of assembly into a display piece you’ll actually want to keep out.
What Makes This Mini Garage Workshop So Satisfying to Build
Workshop-themed miniatures have a special kind of payoff: a lot of small elements combine into a scene that feels surprisingly alive. This garage setup leans into that “tiny parts, big payoff” sweet spot.
- Lots of lived-in detail: benches, tool areas, storage nooks, and realistic clutter create that authentic, busy-workshop look.
- LED lighting adds instant atmosphere: the warm interior light boosts display value, especially on a bookshelf or in a dim corner.
- A focused, single-room diorama: it stays manageable without feeling flat or simplistic.
- Great for detail-oriented crafters: the best moments are the finishing touches—placing accessories, squaring furniture, and styling the workspace.
What’s Typically Inside the Kit (and What to Prepare Yourself)
Miniature craft kits vary slightly by batch, but the overall “build ecosystem” is consistent: structural parts, workshop fixtures, small décor, and lighting components that come together into a complete room scene.
- Structural pieces: walls/floor elements plus key workshop fixtures such as work surfaces, shelves, and storage.
- Garage-style décor: tool-like shapes, small containers, labels/signage, and accessories that sell the theme.
- LED components: parts intended to illuminate the interior once assembled.
- Helpful extras to bring: craft glue, tweezers, small scissors or a hobby knife, a ruler, and a tray or small bowls to keep parts from vanishing.
Build Checklist: Kit Parts vs. Handy Tools
| Category | Examples | Why it helps |
|---|---|---|
| Kit components | Scene pieces, décor miniatures, LED parts | Forms the garage layout and finished look |
| Adhesives | Clear craft glue or tacky glue | Clean bonds without messy overflow on small parts |
| Precision tools | Tweezers, small scissors/knife | Improves accuracy and reduces frustration |
| Organization | Small bowls/tray, labeling tape | Prevents lost parts and speeds up assembly |
| Finishing | Cotton swabs, toothpicks | Helps apply tiny amounts of glue and clean edges |
Time, Skill Level, and the “Tiny Parts” Reality
This style of miniature build rewards patience more than speed. Small components and close-fit assemblies can be relaxing if you enjoy detail work, but they can feel fiddly if you try to rush.
- Best for patient hands: tiny parts often require tweezers and steady placement.
- Plan multiple sessions: shorter builds reduce misalignment, glue smears, and fatigue.
- Common sticking points: keeping corners square, aligning miniature furniture, and routing LED wiring cleanly.
- Workspace matters: a clear table and good overhead light make a noticeable difference.
If you use fast-bonding adhesives, practice basic safety habits—keep glue away from eyes and wash hands after handling. For quick reference, see the American Academy of Ophthalmology guidance on eye safety around super glue.
Assembly Flow That Helps the Scene Look Clean and Realistic
A clean-looking miniature is usually the result of good sequencing. The goal is to avoid trapping yourself—gluing something too early, blocking access for wiring, or bumping finished details while you work.
- Dry-fit first: test placement without glue to understand alignment and build order.
- Structure before décor: complete walls/floor and major furniture first, then add accessories.
- Back to front, bottom to top: it reduces accidental knocks and keeps finished parts protected.
- Use minimal glue: apply with a toothpick for cleaner seams and fewer shiny spots.
- Test lighting before closure: verify LEDs work while wiring is still accessible.
For general consumer product safety reminders (including keeping small parts away from young children and pets), review the CPSC’s general product safety information.
Getting the LED Lighting Right
LEDs are the feature that turns a miniature room into a miniature scene. A little planning makes the lighting look intentional rather than “added on.”
- Hide wires along edges: route cables in corners, behind trim, or along shelf lines where they blend in.
- Check polarity/orientation: if a light doesn’t turn on, the connection direction is a common culprit.
- Secure wiring gently: use tiny dots of glue or small pieces of tape to reduce tension on connections.
- Aim for mood: direct light toward work surfaces and the center of the room for a cozy workshop feel.
Display Ideas and Gifting Moments
Once finished, this miniature garage works as décor—especially when the LEDs are on. It’s the kind of piece people notice, then step closer to inspect all the little details.
If you want a practical add-on gift that matches the workshop theme, pair it with a real tool like the 18″ Aluminum Pipe Wrench for a fun “mini garage + real garage” bundle.
Care, Maintenance, and Long-Term Enjoyment
FAQ
Is this kit suitable for beginners?
Yes, beginners can enjoy it with patience and basic tools. Working in short sessions, dry-fitting parts before gluing, and using tweezers for tiny details makes the build much smoother.
Do the LED lights come installed or do they need wiring?
The LED components typically need to be connected during assembly rather than arriving fully installed. Test the lights before final closure and route wires along corners so they’re easier to hide.
What glue works best for miniature craft kits?
Clear craft glue or tacky glue is usually easiest to control on small parts. Apply sparingly with a toothpick to avoid shiny residue and to keep edges looking clean.







Leave a comment