3-Inch Gravel Grid Stabilizer: Driveways, Patios, Parking
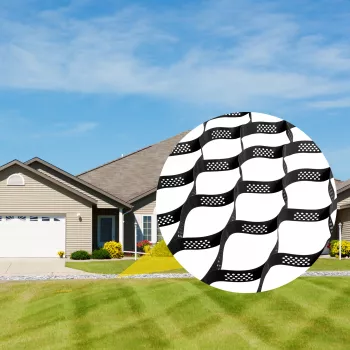
3″ Ground Grid Stabilizer for Driveways, Parking Areas, Patios, and Gravel Bases
A stable gravel surface depends on confinement, drainage, and a base that resists shifting under load. A 3-inch ground grid stabilizer creates a structured cell layer that helps lock in aggregate, reduce ruts, and keep edges from spreading—useful for driveways, parking bays, patios, and other high-traffic gravel zones. When the grid is paired with proper excavation, compaction, and water management, the surface stays more uniform and needs fewer touch-ups over the seasons.
What a 3″ ground grid layer changes in a gravel surface
A 3-inch grid works like a honeycomb frame beneath your gravel: it confines aggregate inside individual cells, limiting sideways movement while distributing loads more evenly. That combination helps a gravel surface behave less like loose rock and more like a structured system.
- Adds confinement so gravel stays where it is placed instead of migrating to the sides or forming low spots.
- Spreads loads across a wider area, helping reduce rutting from vehicle tires and repeated turning.
- Helps maintain a more even surface over time, reducing frequent regrading.
- Supports better performance in wet conditions when paired with proper drainage and a solid base.
- Creates a consistent depth for the top aggregate layer, improving finish and walkability.
These benefits are most noticeable at stress points—turns, brakes, slight slopes, and entrances where tires scuff and push stone outward. The grid can’t replace a strong base, but it can keep a good base from getting “unlocked” by traffic and water.
Where it works best: common project uses
- Driveways: improves resistance to tire tracks, braking ruts, and edge spread at turns.
- Parking areas and overflow lots: stabilizes zones with repeated parking and low-speed turning.
- Patios and seating areas: makes gravel more comfortable to walk on and easier to keep level under furniture.
- Gravel base preparation: provides a structured layer that can support a tidy, uniform surface above.
- Access lanes and utility paths: helps maintain passable surfaces with less maintenance between refills.
Typical applications and recommended approach
| Area | Base focus | Common surface aggregate | Notes |
|---|---|---|---|
| Residential driveway | Well-compacted base with drainage | Angular crushed stone | Pay extra attention to edges and turning zones |
| Parking pad / parking lane | Compaction and thickness for vehicle loads | Angular crushed stone | Consider thicker base for frequent use |
| Patio / seating zone | Flat, well-leveled subgrade | Decorative gravel or crushed stone | Use edging to keep perimeter crisp |
| Garden / utility path | Drainage and weed control | Small angular gravel | Use a separation layer if soils are soft |
Base prep that determines long-term stability
The grid helps, but long-term performance is still decided by what’s under it. A firm, well-drained foundation keeps the surface from settling, pumping, or deforming during freeze/thaw and heavy rain.
- Excavation: remove soft topsoil and organic material until reaching firm subgrade.
- Separation: consider a geotextile fabric over weak or silty soils to limit mixing of soil and aggregate.
- Base material: use well-graded aggregate or crushed stone for a compactable foundation.
- Compaction: compact in lifts; an under-compacted base is a common cause of settling and potholes.
- Slope and drainage: build a slight crown or consistent fall so water does not pond on the surface.
- Edging/containment: add perimeter restraint where gravel tends to spread (turns, downhill edges, patio borders).
For general background on how drainage and base layers affect pavement and aggregate performance, see guidance published by the Federal Highway Administration (FHWA) and resources from NAPA. Material selection and test methods are also commonly standardized through ASTM.
Installation flow for a 3″ grid layer
A clean install keeps the grid flat, aligned, and properly filled so it can confine aggregate without “high spots” telegraphing through the surface.
- Plan layout: measure the area, mark borders, and confirm drainage direction before placing any materials.
- Prepare the subgrade and base: excavate, level, and compact; add separation fabric where needed.
- Place and align grids: start from a straight edge, keep cells aligned, and fit around borders/obstacles.
- Secure as required: use appropriate anchoring for slopes or areas that may shift during filling.
- Fill cells: add angular aggregate, work it into the cells, and top off to cover the grid as desired.
- Compact and finish: lightly compact the surface and add a final thin layer if needed for a clean look.
- Recheck after first use: after initial rain or vehicle traffic, top up low spots and re-level as needed.
Helpful on-site tools vary by job, but having a sturdy hand tool for adjustments and stubborn fittings can save time. If a pipe or fitting needs attention during site work, an 18″ Aluminum Pipe Wrench can be a practical add-on to the kit.
Choosing the right fill aggregate
Maintenance and troubleshooting
Product option: 3″ Depth Ground Grid Stabilizer
See the in-stock option here: 3″ Depth Ground Grid Stabilizer for Driveway, Parking Lot, Patio & Gravel Base.
FAQ
Does a gravel grid stop ruts completely?
It can greatly reduce rutting by confining aggregate and spreading loads, but results still depend on base thickness, compaction, drainage, and how aggressively vehicles turn or brake. If the subgrade is soft or water is trapped, deformation can still occur.
What type of gravel works best inside the grid?
Angular crushed stone typically performs best for driveways and parking because it interlocks and resists rolling. Choose a stone size/gradation that fills the cells well and compacts into a stable layer rather than shifting under traffic.
Is a fabric layer required under the grid?
Not always. Fabric is most helpful over soft, silty, or moisture-sensitive soils where separation prevents mixing and “pumping”; over firm, well-draining subgrade with a properly built base, it may be optional.









Leave a comment