650W 3000 PSI Airless Stand Sprayer: Setup & Tips
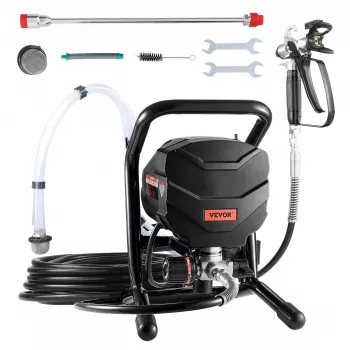
650W 3000 PSI Airless Electric Stand Paint Sprayer for Home & Furniture
A 3000 PSI airless stand sprayer is built for faster coverage and a smoother finish than brushes and rollers on many home and furniture projects. This guide breaks down what the 650W airless sprayer is designed to do, how to set it up, what to spray with it, and how to avoid common issues like clogging, overspray, and uneven coats.
What an airless stand sprayer is best for
Airless sprayers push paint through a small tip at high pressure, creating a controlled fan pattern without needing compressed air. That makes them a strong fit for projects where speed and consistency matter.
- Covers broad areas quickly: walls, ceilings, fences, cabinets, doors, and larger furniture pieces.
- Produces a consistent finish: material is atomized at the tip for even coverage when your distance and overlap stay steady.
- Ideal for multi-coat systems: primer plus topcoats, stain-blocking primers, and repainting projects where time adds up.
- Stand design supports longer sessions: a stable base helps reduce fatigue compared with handheld-only spraying.
- Not ideal for: tiny touch-ups, ultra-fine artistic work, or tight indoor spaces without serious masking and ventilation.
Key specs that shape performance
Two numbers influence how the sprayer behaves in real projects: motor power (how steadily it can move coating) and pressure (how well it can atomize and hold a consistent fan).
- 650W motor: geared toward DIY and light-to-moderate home jobs where steady flow matters.
- Up to 3000 PSI: supports consistent fan patterns and can help with thicker coatings (when the product is compatible).
- Electric operation: plug-in power for uninterrupted spraying compared to battery-only tools.
- Stand format: easier hose management and a more organized, tip-resistant setup.
- Tip and pressure choices matter: fine-tuning reduces overspray, texture, and wasted material.
Quick spec-to-use guide
| Feature | What it affects | Practical takeaway for home & furniture |
|---|---|---|
| High pressure (up to 3000 PSI) | Atomization and fan pattern stability | Start lower for furniture to reduce bounce-back; increase only as needed for even coverage |
| 650W electric motor | Flow consistency over longer runs | Better for multi-room or multi-piece projects than small handheld sprayers |
| Stand design | Stability and setup convenience | Keeps the unit upright and helps prevent hose tugging from tipping the sprayer |
| Tip selection (varies by coating) | Spray width and material output | Narrower fan for furniture and trim; wider fan for walls and fences |
| Proper filtering/straining | Clogs and spitting | Strain paint and keep filters clean to avoid tip blockages and streaks |
Typical projects and recommended approach
Airless sprayers are flexible, but the best results come from matching your prep and spraying style to the surface.
- Furniture repaint (dressers, tables, chairs): scuff-sand to dull glossy finishes, clean thoroughly, prime if needed, then spray multiple light coats. Let pieces cure fully before heavy use.
- Cabinets and doors: remove hardware, label parts, and spray doors flat when possible to reduce runs. Keep to thin coats and respect flash time between coats.
- Interior walls: mask aggressively, keep a wet edge, and maintain consistent distance and overlap. Some coatings specify back-rolling—follow the coating label.
- Exterior surfaces: watch wind and temperature, protect landscaping, and choose exterior-rated coatings for UV and moisture exposure.
- Stain/clear coats: confirm compatibility with sprayer components and follow product directions on viscosity and tip selection.
Setup checklist for cleaner results
Most “sprayer problems” start as prep problems. A short checklist helps prevent rework and keeps your finish looking intentional.
Spraying technique that prevents runs and rough texture
Cleanup, storage, and maintenance essentials
Safety and surface-protection basics
- Ventilation and respiratory protection: follow guidance for spray painting controls and respirators from NIOSH.
- High-pressure caution: never point the spray at skin; injection injuries can be severe and require urgent medical care.
- Lead paint awareness: older homes may contain lead paint—use certified lead-safe practices per the U.S. EPA RRP program.
- Masking and containment: protect adjacent rooms, HVAC returns, and outdoor areas from drift.
- Keep kids and pets away: restrict access until airborne particles settle and odors clear.
Product spotlight: 650W Airless Paint Sprayer (3000 PSI) for home and furniture
If faster coverage and repeatable finishes are the goal, a stand-style airless unit is a practical upgrade from rollers or small handheld sprayers. The 650W Airless Paint Sprayer, 3000 PSI Electric Stand Sprayer for Home & Furniture is designed for DIY homeowners tackling repeated projects—like room refreshes, fence updates, and furniture makeovers—where steady flow and consistent atomization make the work go faster.
For best results, pair the sprayer with disciplined prep: strain coatings, test the fan on cardboard, and build coverage with multiple lighter passes instead of one heavy coat. For setup and maintenance tasks around painting projects (tightening fittings, stabilizing connections, or handling hardware), an 18″ Aluminum Pipe Wrench can be a handy addition to the toolbox.
FAQ
Is 3000 PSI too much for furniture painting?
No—pressure is adjustable, and furniture often looks best at lower pressure to reduce overspray and bounce-back. Use the smallest appropriate tip and build coverage with light coats for a smoother finish.
Do you need to thin paint for an airless sprayer?
Many modern coatings are formulated to spray without thinning, but it depends on the product label and viscosity. Strain the paint first and only thin if the manufacturer allows it.
How do you prevent clogs and spitting while spraying?
Strain your coating, keep filters clean, and use a tip size that matches the material. Flush the system promptly after spraying so paint doesn’t dry inside the tip, gun, or filters.











Leave a comment